


If you have ever wondered how to make charm bracelets that actually look polished and last for years, the good news is that the process is far simpler than it appears. With the right findings, a little planning, and two pairs of pliers, you can build a personal, storytelling piece of jewelry in under an hour. This guide walks you through every step, the supplies you need, and the small details that separate a beautiful charm bracelet from a sloppy one.
Explore Our Categories


Table of contents
What Is a Charm Bracelet?
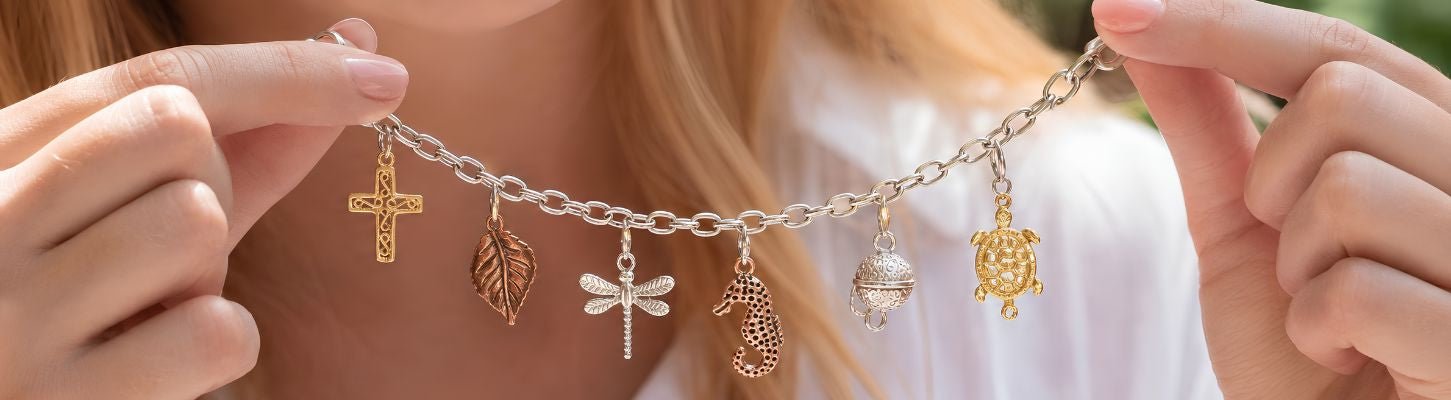
A charm bracelet is a chain, beaded strand, or cuff that holds a collection of small decorative pendants called charms. Every charm can symbolize a special memory, a favorite pastime, a travel adventure, a loved one, or just a design you adore. Because charms can be added, swapped, or removed using jump rings, a charm bracelet grows with you over time. This versatility is what makes charm bracelets treasured gifts and personal mementos.
Essential Materials for Crafting Your Charm Bracelet
Before you begin, gather everything in one spot so you are not scrambling halfway through. Here is the basic supply list:
-
A bracelet base (chain, bangle, beaded strand, leather cord, or stretch cord)
-
Four to eight charms in your chosen theme
-
Open jump rings, typically 4mm to 5mm wide and 20 gauge
-
A clasp (lobster claw or toggle), if your base needs one
-
A set of two chain-nose or flat-nose pliers for jewelry work
-
A bead mat or soft cloth to lay out your design
-
Wire cutters, if you need to trim your chain to size
Quality matters here. Cheap jump rings can pop open over time and let your charms slip off. Look for sturdy findings from a reputable supplier such as Atlanta Findings Company, where you can shop a curated range of charms and connectors built for everyday wear.
How To Make Charm Bracelets in 6 Easy Steps
Step 1: Choose Your Bracelet Base
Start with a base that supports the weight of your charms. For a classic look, pick a chain bracelet with open links at least 2mm wide so jump rings can pass through easily. If you prefer something softer, a beaded bracelet on stretch cord works well. Measure the circumference of your wrist and add one inch to ensure a comfortable fit. Standard bracelet lengths are 7 to 8 inches.
Step 2: Choose meaningful charms to go with your bracelet
This is the fun part. Choose charms that mean something to you. Birthstones, initials, travel symbols, religious icons, hearts, and animal motifs are all popular options. Aim for charms in a similar size range, roughly 6mm to 15mm, so the bracelet looks balanced. Typically, a charm bracelet is adorned with four to six carefully chosen charms. Anything more can feel crowded and uncomfortable to wear.
Step 3: Plan Your Charm Layout
Before you attach anything, lay your bracelet flat on a bead mat and arrange the charms in the order you want them to hang. Some makers space charms evenly across the full bracelet. Some arrange the charms in the center to keep them displayed prominently on the wrist. Try both and pick what looks best to you. Snap a quick photo to preserve your design layout for easy reference during assembly.
Step 4: Properly Opening Jump Rings
Many beginners struggle here. Hold the jump ring with pliers on either side of the gap, twisting one hand toward yourself and the other outward. This opens the ring sideways without warping its round shape. Never pull the ends straight apart. A warped jump ring will not close cleanly and is more likely to fail.
Step 5: Attach Each Charm to the Chain
Slide your first charm onto the open jump ring, then thread the ring through a link on the bracelet. Secure the jump ring by twisting back in the opposite direction until the ends align perfectly. Press them together firmly with your pliers. Repeat for each charm, working from the center outward so your layout stays balanced.
Step 6: Secure the Clasp and Inspect Your Work
If your bracelet base does not already have a clasp, attach a lobster claw or toggle using one more jump ring at each end. Once everything is connected, hold the bracelet up and give it a gentle shake. Listen for loose charms and check every jump ring closure. Any ring that is not flush should be re-pressed before you wear or gift the piece.
Design Tips From Experienced Makers
A few small habits can elevate your finished bracelet. Mix metal finishes only intentionally; either commit to one tone or balance gold and silver across the full design. Use spacer beads between charms if you want extra movement and visual breathing room. For permanence, you can swap jump rings for soldered rings on key charms once you are confident in the layout. And always store your bracelet flat to prevent tangling.
Wrap Up
Learning how to make charm bracelets is one of the most rewarding entry points into jewelry making. With the right base, well-made jump rings, and a small set of meaningful charms, your finished piece can become an heirloom. When you are ready to source supplies, explore the charms and connectors collection at Atlanta Findings Company for findings designed to last.
Need more guidance on making charm bracelets? Reach out to our expert support team at info@Atlantabeadcompany.com or call +1 888-234-1234. You can also explore our blog for extra tips and inspiration.
Frequently Asked Questions
How Many Charms Should Be on a Charm Bracelet?
Four to six is the sweet spot. Fewer than four can look sparse, and more than eight tends to bunch and feel heavy on the wrist.
What’s the Best Way to Begin a Charm Bracelet?
Begin with one meaningful charm and a quality chain base. Add new charms over time to mark events, gifts, or milestones.
Can I Make a Charm Bracelet Without Pliers?
Technically, yes, with pre-attached charms and a stretch base, but two pairs of jewelry pliers give you a far cleaner, longer-lasting result.
Which Bracelet BASE Works Best for Those Just Starting Out?
A simple sterling silver or gold-filled cable chain with 3mm to 5mm open links. It is forgiving and works with almost any charm size.


